Most crocheters learn from someone else — a parent, grandparent or friend. Even if there were no how-to books, the art of crochet would flourish down through the generations.
Here are some suggestions from experienced teachers that will help you get started.
WHO?
You can teach anyone — women, men, teens and young children from about 6 on up. You can even share the skill without sharing a language.
WHAT?
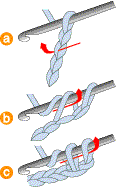
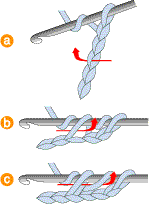
Get them started by learning just the basics — the chain, single and double crochet stitches. Once these are mastered, your student will be able to fly on her own to new heights. Here are some diagrams that will help your students.

Chain (ch)

Single Crochet (sc)

Double Crochet (dc)
Most crocheters learn from someone else — a parent, grandparent or friend. Even if there were no how-to books, the art of crochet would flourish down through the generations.
Here are some suggestions from experienced teachers that will help you get started.
Swatch for Beginners (made in advance by instructor)
Chain 23.
Row 1: Single crochet in second chain from hook and in each chain across:you will have 22 single crochets. Chain 1, turn.
Row 2: Sc in each sc, ch 1, turn.
Repeat Row 2 until piece measures about two inches long. Remove hook, and place a safety pin in last loop so it does not unravel before it goes to the student.
Sit down beside (not in front of) your student. Remove the safety pin. Insert the hook in the last loop, chain one and turn, work the first two stitches in single crochet, going slowly and showing the student the steps. Then give the hook and the work to the student and guide her through working single crochets across the rest of the row.
Let the student hold the work and the hook however it is most comfortable. There's no one right way! And don't worry about gauge or even stitches at this point. Let them look at the diagram for single crochet as they work. GIVE LOTS OF COMPLIMENTS! Explain that it's not their fault if the yarn splits, but they will have to take out and redo the stitch.
Have the student finish the row, then explain about the turning chain. Have student chain 1 and turn, and show where the first stitch of the next row begins. Let the student work 6 rows of single crochet.
The biggest challenge is to make sure they bring the yarn over the hook from BACK TO FRONT, rather than FRONT TO BACK. Have them look at the right and wrong diagrams to help with this. Have the student count their stitches at the end of each row. By this time their hands may be a bit tired, so it's time for a cup of coffee or tea, while you explain that single crochet is the shortest stitch, and that next they will learn to make taller stitches.
Break Time
Now back to crochet! Have them make three turning chains, then work double crochet across the row. Show them the diagrams that explain that the turning chains count as a stitch, and where to work the last stitch. Let them work six rows in double crochet. Show them how to finish off the work.
Now the student should be fairly comfortable, so it's time to show them how to make a slip knot and a starting chain, and then how to work single crochet into it. Have them work a few rows.
Show them how to finish off and weave in their ends.
To keep up their enthusiasm, it's time to show them some fun stuff, just to give them an idea. Show them how to work a 3-dc shell, a puff stitch, and a bobble. They don't have to master them at this point, just try them so they can see the potential.
They are now a crocheter and ready for there first project!
There first real project should be something like a scarf, and we've given a pattern that's a good one for a beginner.
Show them how to read the pattern and help them get the scarf started with the yarn they have chosen (avoid dark color yarns or those with lots of texture).
Download a certificate to fill out for the student.
Each One Teach Two Logo by Brittany Lord
